Showing posts with label DIY. Show all posts

Tuesday, March 15, 2016

What was once ruined and unwearable, is new again!

2 years ago, I was really hooked on the GAP's broken-in khakis - I loved the fit and comfort, and the casual cool vibe it gave off. Some materials and color were even office appropriate so I purchased 4 pairs. They are now on my 'do not buy' list because I can see myself getting them in every single available color and material. 

My favourite pair was in a beautiful pale blue color called Sandstorm, that I only got to wear 8 times before tragedy struck. I got a stain on it and for some reason, I decided to try to get it out with bleach. Why? You ask - I don't know. Not only did I use bleach, but I haphazardly applied it and obviously my pant ended up with bleached out splotches all over it. To this day, I still wonder what was going on in my head. 

My beloved

I was devastated. I kept it in my closet and desperately attempted to make outfits with them so they would hide the bleach stains. I debated back and forth about whether to get rid of them or keep them and dye them a different color. It saddened me to think about dyeing them since the color itself was why I loved them so much. So there they sat for more than a year, when finally I decided to just go for it. 

What color, I wasn't sure, but the first step was to bleach them and prepare it for possibilities. 

The blank canvas

The eventual color I chose was a beautiful purple, and with the help of my husband, now have a pretty amazing 'new' pair of pants that I know will fit me great. I can't wait to break them out and make new outfits with it!

New love!


After 3 packs of RIT dye

Friday, March 20, 2015

TGIF!

TGIF! Must be said twice. What a week... I am happy to announce that March is still a no-purchase month for me and I haven't had an urge to buy anything; I've also had 3 no-spend days in a row, this last week! 

My younger cousin has taken up sewing lately so instead of donating my items, I have been giving them some thought to maybe re-vamping/re-purposing them. I was given two, WAY over-sized t-shirts (in the same style!) and I asked her to turn them into a crossbody feed bag, and a laptop sleeve.


(original t-shirt; two sides of the feedbag)

The laptop sleeve (not shown) worked well and the look of the bag was great except the material is 100% cotton so there is a lot sagging. We are currently thinking of how to correct this - the most obvious answer is to add a lining of the non-sag nature (perhaps with another item I already have), buuut... we may also re-re-vamp it, entirely.

I'm now less 2 t-shirts I will never wear and have one functioning laptop sleeve, and working toward, a functioning feed bag =) 

Wednesday, December 10, 2014

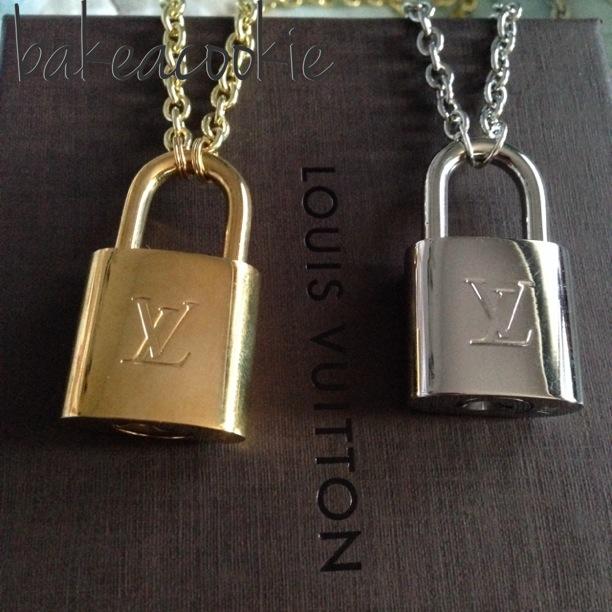
DIY LV lock necklace by bakeacookie

As I mentioned before, I'm part of a wonderful online community of people who love to chat about fashion, bags, life, and everything in between! One such lovely member had a great idea to re-purpose LV locks into necklaces - it was such a great idea that I had to ask her to share! Below is a guide from bakeacookie on how she did it, and the supplies she used. Many thanks to bakeacookie for taking the time to share with us!


Some LV bags come with these gorgeous brass or silver toned locks. But despite carrying my Speedy Bandoliere and Alma, I never used these pretty little locks.

After checking out a few posts at the Purseforum, I took note of a Chanel lock necklace. Pinterest had examples, and my search even yielded a one of a kind vintage lock necklace using LV locks.

Convinced I could do this myself, I set off. I plucked the locks out from their dust bags and made a trip to the craft store, Joanns in my case.

Items needed:

    • Chain of desired length. I prefer a 28-inch chain. 
    • This allows me to place it over my head, rather than have to attach a clasp.
    • Jump rings
    • Jewelry/needle nose pliers.
    • LV lock and key


Directions:

Open the jump ring with the plier, and insert them through the loop of the chain. Close the jump ring, getting the ends as close together as possible for a secure connection.


Repeat for the opposite end.

Open the lock and thread the lock through the jump rings.

Close the lock and voila, an LV lock necklace in less than 5 minutes.

To my surprise, there are (at least) two types of jump rings!

I preferred the easy to use single loop jump ring, shown in the silver lock necklace. It was easy to use, and it feels secure with the weight of the lock on it.

But there are double loop jump rings, similar to a key ring. These were much, much harder to work with, and somehow I pried them open enough to string them onto the gold chain. These are really really secure, there's no way for the jump ring to part at all without much prying.


Because I used the double loop on the gold necklace, it took 20 minutes (and assistance of my brother to pry them open) to make this necklace. 


The price for both the gold and silver chain, plus gold and silver jump rings came out to about $6.00.

The locks came with my bag, but can be purchased as a replacement part at Louis Vuitton for $39 each.


Sunday, November 16, 2014

Re-purposing - turning my necklace into a bag fob


I frequent a popular forum called thePurseforum, and one of the threads that I have the pleasure of being a part of, we discuss a number of topics ranging from "shopping from my own closet" to what to pack for traveling, to significant life events - recently there were some DIYs shown from one of the members (bakeacookie) and also a few posts about fobs. 

Taking a queue from these latest topics, I decided to re-purpose an old necklace of mine into a bag fob. I think I bought this necklace on my last trip to Malaysia (~13 years ago) - I wore it a few times but stopped because it had quite a short chain making it more of a choker and gave me a rash each time. I loved the coloring so I kept it and the other night had a great idea to remove it from its chain and hang it off one of my black bags that has silver hardware.